
12 Feb 2024 - News
How to Make Ghee at Home
Introduction to Ghee
Ghee, a type of clarified butter, is a beloved ingredient in Indian cuisine. It’s known for its rich, nutty flavor and boasts several health benefits.
Making it at home is simple — all you need are some basic ingredients and minimal equipment. Plus, doing so allows you to have this versatile ingredient on hand whenever you need it.
Benefits of Making Ghee at Home
- More cost-effective than buying it pre-made.
- Guarantees quality and freshness.
- Avoids additives or preservatives that can be found in some store-bought kinds.
Importance of Ghee in Ayurveda
Ghee holds a special place in Ayurveda, the ancient Indian system of holistic medicine. Not only is ghee believed to balance all three doshas (Vata, Pitta, and Kapha), but it’s also considered one of the most sattvic (pure) foods.
In terms of Pitta dosha specifically, ghee has cooling and nourishing properties. It’s often used to soothe inflammation, support digestion, and promote overall well-being.
Ingredients Needed
Butter: Unsalted butter is recommended for making ghee because salt will decrease its shelf life.
Equipment Required
For making ghee at home you’ll need:
- A heavy-bottomed saucepan or pot.
- A wooden spoon or spatula.
- Cheesecloth or fine-mesh strainer.
- Glass jar or container for storing your finished product.
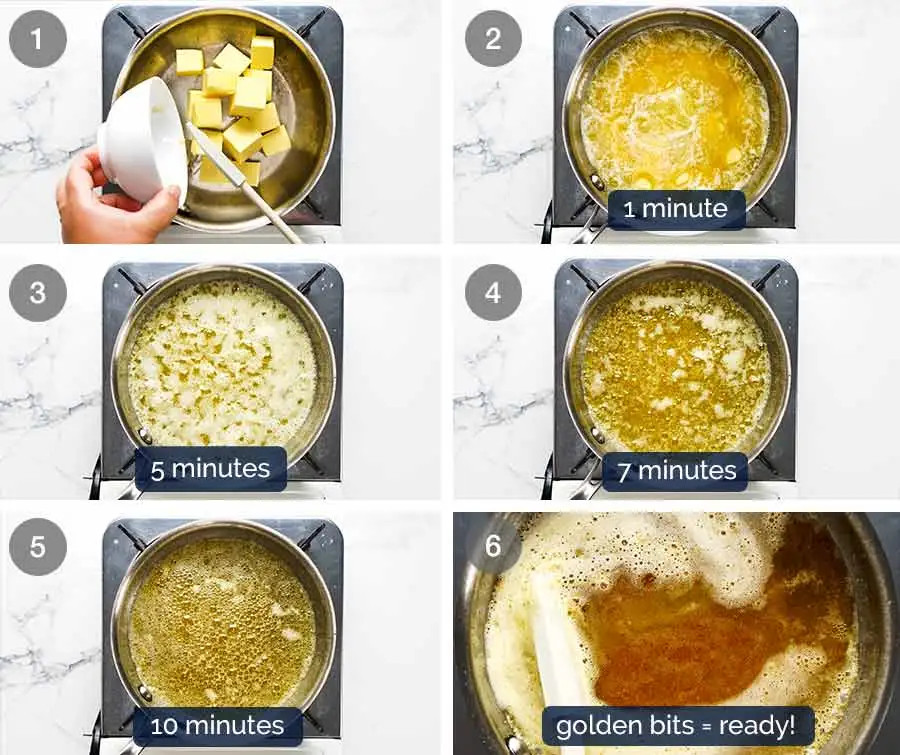
Step-by-Step Guide to Making Ghee
1. Clarifying the Butter: Melt the butter in a heavy-bottomed saucepan over low heat. As it melts the foam will rise to the top.
2. Skimming Off the Foam: Once the butter has completely melted use a spoon or ladle to skim off the foam that sits atop your mixture; these are milk solids that we won’t be using.
3. Filtering the Ghee: Continue to cook the butter until it turns golden brown and the milk solids settle at the bottom of the pan. Next, carefully pour your clarified butter into a cheesecloth or fine-mesh strainer to remove any remaining solids.
Tips for Perfect Ghee
- Set heat to low so you don’t burn the butter.
- Stir occasionally as it cooks.
- Choose high-quality butter for the best taste.
Storing Ghee
Once strained, let your ghee cool completely before transferring it into a clean, dry jar or container with a tight-fitting lid. Store at room temperature for up to several months or in fridge for longer shelf life.
Using Ghee in Cooking
Ghee has a high smoke point and can be used as a flavorful alternative to butter or oil in sautéing, roasting, and baking. Its rich, nutty flavor pairs well with savory and sweet dishes alike.
FAQs?
1. Can I use salted butter? It’s best not to because you’ll have less control over the flavor and excess sodium can ruin your final product.
2. How long does homemade ghee last? Several months when stored properly at room temperature; even longer when refrigerated.
3. I made some ghee, can I still use the milk solids? While you can throw them out, there’s a number of people who use them in other recipes to add some flavor to soups and sauces.
4. Can I spice up my ghee? Yep! Feel free to add herbs or spices as it’ll give you a unique taste. A popular combo that many say is good is turmeric and ginger for an aromatic flavor.
5. Can lactose intolerant people eat ghee? Yes, they should be able to since the butter has had all the lactose cleared away during the clarification process.h means the milk solids and lactose have been removed during the clarification process. Many lactose-intolerant individuals find that they can tolerate ghee without any issues.
Christianne Madrazo. Certified Ayurvedic Practitioner, graduate of Mount Madonna Institute, College of Ayurveda in California, and student of Dr. Vasant Lad, one of the world’s foremost experts in Ayurveda.
AyurVida Wellness and Clinic is located in Mission Hills, San Diego, CA.
FOR ASSISTANCE TEXT 619-637-0201

CONTACT US
PHONE:
619-291-6614
For immediate assistance:
TEXT 619-637-0201
ADDRESS:
1611 West Lewis San Diego CA 92103